
How to Chainsaw Carve a Bear: Practical Guide for 2026
Master how to chainsaw carve a bear with step-by-step blocking and detailing techniques in this woodcarving guide for October 2026.
 By Clint DeBoer
Updated October 2, 2026
By Clint DeBoer
Updated October 2, 2026

Starting a timber sculpture from a raw tree trunk demands deliberate throttle control, stable footing, and a clear understanding of three-dimensional anatomy. Learning how to chainsaw carve a bear bridges the gap between basic firewood processing and sculptural woodworking, transforming standard timber rounds into classic woodland figures. While casual timber work or clearing limbs with hand saws for cutting branches focuses primarily on clean separation cuts, sculptural work requires cutting smoothly with both the bottom rail and the nose tip of the guide bar. Achieving balanced proportions without cutting away critical structural timber relies on patient blocking routines, proper depth gauge awareness, and specialized saw setups designed to minimize kickback forces.
Working with powerhead carving equipment also requires understanding the physical grain characteristics of green and seasoned timber. Whether you follow step-by-step illustrated patterns or develop your forms freehand from log stock, balancing waste clearance with refined fur texturing dictates the quality of the finished bear. Equipping your saw with a narrow-radius carving bar or a powered gouge attachment allows for controlled contours around the muzzle, ears, and paws that standard forestry bars cannot easily produce. With the right techniques and reliable protective equipment, carving a durable bear sculpture becomes an achievable project for any dedicated woodcutter.
| Award | Product | TGH Score About TGH ScoreThe TGH Score is our own rating from 0 to 10, based on performance, design and build, ease of use, and value. It reflects independent research and is never influenced by manufacturers, retailers, or affiliate commissions. Learn more › | |
|---|---|---|---|
| Best Overall |
The Complete Guide to Chainsaw Carving
|
8.9/10 | Buy |
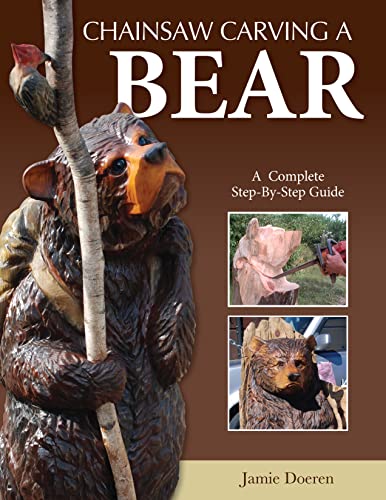 Chainsaw Carving a Bear: A Complete Step-By-Step
|
8.3/10 | Buy | |
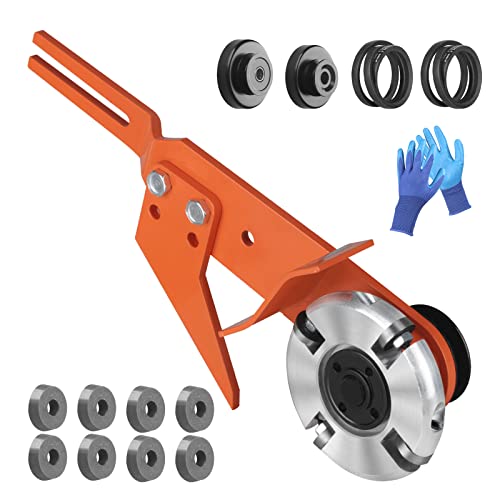 HOTYELL Chainsaw Carving Mill Attachment
|
8.0/10 | Buy |
Complete Guide to Chainsaw Carving a Bear
Learning how to chainsaw carve a bear requires taking a timber round through progressive stages of rough blocking, anatomical massing, facial sculpting, and surface texturing. The primary objective is establishing accurate structural proportions before attempting fine details, ensuring the sculpture remains balanced and stable on its pedestal. Rather than rushing into intricate cuts, successful carvers define clean geometric planes that delineate the head, torso, and limbs. Progressing systematically through each stage prevents accidental over-cutting and preserves essential wood for final detailing.
Selecting Timber Species and Log Dimensions
Choosing the right species of timber directly influences cutting speed, chain sharpness retention, and long-term crack resistance. Softwoods such as eastern white pine, western red cedar, and bald cypress are popular choices for both beginner and seasoned carvers due to their straight grain and moderate density. These species cut smoothly with minimal chain resistance, reducing powerhead strain and physical fatigue during long carving sessions. Dense hardwoods provide exceptional outdoor rot resistance, but they dull chain cutters rapidly and demand substantially more power from the saw engine.
Fresh green logs cut significantly easier than dry timber because natural moisture lubricates the cutters and cools the guide bar rails. However, green timber will shrink as moisture evaporates, leading to radial checks and splits that can mar the finished sculpture. Inspecting the log before carving helps identify interior rot pockets, severe spiral grain, or embedded dirt that can instantly damage a sharpened cutter tooth. Selecting a sound log with a straight grain and an adequate diameter provides the necessary mass to sculpt a well-proportioned bear.
Relieving tangential drying stress in green timber is essential to prevent splits from forming across the bear’s facial features. Cutting an intentional vertical relief kerf along the backside of the log down to the center pith redirects drying stress away from the front of the sculpture. This hidden relief channel allows the log to contract naturally as it seasons without pulling the face or chest apart. Squaring both ends of the log with perpendicular bucking cuts ensures the timber stands firmly upright on your carving bench without rocking.
Essential Safety Protocols and Reactive Force Management
Chainsaw carving presents unique physical risks because sculptors routinely cut with the nose of the bar at varied angles. Personal protective equipment compliant with OSHA 1910.266 regulations is mandatory before starting any carving saw. Operators must wear certified cut-retardant chainsaw chaps, heavy-duty leather boots with steel toes, and cut-resistant work gloves. A complete forestry helmet system equipped with a steel wire-mesh face shield, impact-rated safety glasses, and hearing protection defends against engine noise and high-velocity wood chips.
Rotational kickback represents the primary physical hazard when plunging the bar tip or shaping concave anatomical features. Kickback occurs when the moving chain in the upper quadrant of the guide bar nose contacts solid wood, driving the powerhead violently upward toward the operator. Conventional guide bars feature wide sprocket noses that expand this hazardous kickback zone. Maintaining a secure wrap with your left thumb around the front handlebar ensures positive mechanical control if the chain encounters an unexpected knot.
Testing both the manual handguard and the inertia mechanism of the chain brake before every work session is critical for operational safety. Operators should maintain a balanced athletic stance with feet planted shoulder-width apart, avoiding unbalanced reaches across the timber. Never carve above chest height, as high cuts diminish physical leverage and increase fatigue. Positioning your body slightly offset from the powerhead centerline keeps your torso safely outside the cutting plane if the saw recoils unexpectedly.
Powerhead Sizing, Carving Bars, and Specialized Attachments
Operating a dedicated two-saw setup provides the ideal combination of power for bulk removal and nimbleness for fine detailing. A mid-sized gas chainsaw fitted with a standard guide bar provides the torque needed to block out the log and remove heavy waste slabs. For shaping intricate facial landmarks and paws, switching to a lightweight powerhead or a modern cordless saw reduces wrist strain. A lightweight powerhead allows you to manipulate the bar nose smoothly through compound curves without fighting excessive tool mass.
Standard logging guide bars lack the agility required for detailed sculpture due to their wide nose radiuses and aggressive chain pitches. Purpose-built carving guide bars feature solid stellite-tipped noses with no internal sprockets, tapering down to a narrow dime-tip or quarter-tip radius. These tiny nose profiles substantially shrink the kickback contact zone and permit tight plunge cuts inside confined anatomical spaces. Pairing a carving bar with a quarter-inch pitch saw chain produces clean, splinter-free cuts that leave remarkably smooth surface finishes.
Beyond traditional guide bars, mechanical carving attachments offer immense shaping capability for log sculptures. For example, the HOTYELL Chainsaw Carving Mill Attachment mounts directly onto small saws such as the Stihl MS170, MS180, MS210, MS230 or Husqvarna 137, 142, 235, and 240 series. Driven by a sturdy steel pulley with a 3:2 reduction ratio and a V-belt, this attachment converts the powerhead into a powered high-speed gouge and log notcher. Its lightweight titanium-aluminum alloy body and twelve sharp planer blades enable carvers to rapidly hollow out torso contours, smooth stubborn knots, and carve broad muscle curves without hand chisels.
Staging and Rough Blocking: Establishing Proportions
Rough blocking establishes the anatomical foundation of the bear and represents the most critical phase of the carving process. Using bright timber crayons or carpenter chalk, draw horizontal reference lines around the log bark to divide the trunk into three proportional segments. The upper third encompasses the head and ears, the middle third holds the chest and front paws, and the lower third forms the hindquarters and base pedestal. Stepping back several paces to inspect these reference marks ensures that the animal’s mass is centered squarely over the base.
The initial cutting sequence removes the large vertical slabs of waste wood from the front and flanks of the log. Carvers make a horizontal stop cut beneath the chalk line representing the snout, followed by vertical downward cuts from the top of the log to release the corner waste chunks. Slicing away these primary corners leaves a stepped block that roughly defines the animal’s front profile. Keeping these preliminary cuts conservative ensures you retain sufficient sacrificial wood for adjustments if your initial proportions appear slightly off.
After defining the primary silhouette, carvers remove the sharp ninety-degree corners with forty-five-degree chamfer cuts. Slicing off these hard edges transforms the rectangular block into an octagonal mass that naturally approximates the rounded shape of a standing bear. This systematic corner reduction should be applied evenly around the shoulders, head block, and lower hips. Shaping the timber into flat, symmetrical facets makes it much easier to balance the proportions on both sides before transitioning to curved anatomical shapes.
Maintaining excess structural timber around fragile projection areas prevents accidental breakage during heavy roughing cuts. Delicate anatomical features like the snout and ears are vulnerable to fracture from chain vibration if they are isolated too early in the process. Keeping the neck connection thick and supported protects the head block while the larger torso and legs are being established. Only when the torso and lower limbs are properly blocked out should you begin narrowing the fragile wood around the upper skull.
Sculpting Head, Muzzle, and Anatomical Features
Sculpting the bear’s head requires light throttle control and precise maneuvering with the nose of the carving bar. To establish the snout, make two downward angled cuts along the sides of the head block to taper the muzzle inward from the cheek planes. A clean horizontal undercut beneath the jaw establishes the chin and separates the head block from the upper chest. Working carefully from both sides helps ensure that the snout remains straight, symmetrical, and centered along the vertical axis of the body.
Forming the ears requires light, shallow cuts to avoid cutting into the crown of the skull. Carvers plunge the bar tip behind each ear block, cutting forward toward the brow ridge to isolate the curved outer ear shell. Angling the guide bar slightly outward gives the ears an alert, lifelike expression rather than leaving them looking like rigid blocks. After defining the outer ear contour, use the rounded nose of the bar to scoop out the inner ear canal without compromising the ear’s structural base.
Defining the muscular transitions along the torso gives the bear realistic volume and vitality. Sculpting a pronounced hump over the upper shoulders immediately identifies the figure as a majestic grizzly or black bear. Carvers cut sweeping vertical relief grooves between the front paws and the ribcage to separate the limbs from the main body. Angling these separation cuts inward creates deep, natural shadows under the forearms and defines the powerful shoulder joints, enhancing the three-dimensional depth of the sculpture.
Mastering these anatomical landmarks is greatly simplified by consulting structured pattern guides and proven woodcarving manuals. Detailed resources like Chainsaw Carving a Bear: A Complete Step-By-Step from Fox Chapel Publishing and The Complete Guide to Chainsaw Carving provide illustrated instructions that clarify muscle anatomy and proportional benchmarks for both realistic and caricature bears. These texts offer practical blueprints for beginners, helping prevent common mistakes such as cutting the snout too thin or setting the eyes unevenly. Reviewing established proportional guidelines gives carvers the confidence to execute each anatomical cut cleanly.
Detailing, Paw Definition, and Fur Texturing Methods
Refining the paws transforms raw timber blocks into expressive anatomical features that anchor the sculpture. Using the fine tip of a carving bar, make light vertical cuts across the front paw pads to separate individual toes. A subtle horizontal undercut beneath each paw lifts the foot pads off the pedestal base, creating distinct visual separation between the animal and the ground. Rounding the edges of each toe with a gentle brushing motion removes tool marks and softens the foot structure for a natural stance.
Fur texturing gives the bear its signature visual softness and conceals minor tool marks left behind during rough blocking. The standard texturing method involves feathering the wood using the bottom curve of the guide bar tip while running the engine at moderate throttle. Glancing the spinning chain lightly across the timber pulls out fine, fibrous shavings that resemble genuine fur clumps. Maintaining a relaxed grip and sweeping the saw rhythmically produces an organic texture that looks far superior to rigid, mechanical notches.
Following natural anatomical grain flow is critical when applying fur texture across different body regions. The fur should flow downward along the spine, angle backward across the flanks, and sweep outward across the rounded contours of the shoulders and thighs. On the face and snout, the texturing cuts must be much shorter and lighter, radiating outward from the bridge of the nose toward the cheeks. Sweeping the chain against the natural hair direction produces messy, splintered fibers that detract from the underlying anatomical form.
Before applying overall fur texture, carvers frequently encounter stubborn branch stubs or tight crotches that require selective trimming. While heavy wood removal relies on the powerhead, carvers managing raw log stock or clearing surrounding branches often keep manual pruning saws for branch management on hand to clean up raw wood knots before laying out cuts. Clearing knotty grain and loose bark pockets before running a fine carving chain prevents cutter deflection and keeps your detailing cuts smooth and consistent.
Surface Finishing: Burning, Sealing, and Long-Term Preservation
Surface finishing protects raw wood fibers and enhances the visual depth of the textured fur. Passing a handheld propane torch evenly across the carving burns away loose wood fuzz and darkens the recessed grooves. Scorching the bear creates rich, dark shadows inside the ear canals, around the eyes, along the claws, and under the belly. This thermal treatment produces striking contrast between the raised outer fur ridges and the deep shadowed cuts, bringing the animal’s facial expression to life.
After torching, scrubbing the charred wood with a stiff wire brush removes loose ash and polishes the grain. Brushing firmly in the direction of the fur sweeps cleans the raised ridges while preserving the dark carbon pigment inside the deep grooves. This burnishing process highlights the natural growth rings of the timber and accentuates the bear’s muscular contours. Blowing away leftover dust with compressed air cleans the wood pores for the application of protective sealants.
Applying an exterior-rated protective finish shields the sculpture against moisture absorption, mildew growth, and sun fading. Penetrating timber oils, exterior spar varnishes, or marine-grade urethanes soak deep into the grain to create an elastic moisture barrier. The first coat should be applied generously so the dry wood fibers absorb the protective finish thoroughly. Applying multiple light coats over several days builds a durable weather seal that flexes naturally as ambient humidity fluctuates through the seasons.
Sealing the open end grain exposed on top of the head and beneath the pedestal base is vital for long-term crack prevention. End-grain wood cells act like open capillary tubes, absorbing and releasing atmospheric moisture much faster than side grain, which leads to severe checks. Soaking these end-grain surfaces with multiple heavy coats of sealer or specialized end-grain wax blocks moisture migration. Elevating the finished bear slightly off damp soil with rubber risers prevents ground moisture from wicking into the base, preserving your handcrafted sculpture for years.
Carving a bear from raw timber requires patience, steady throttle control, and respect for cutting dynamics at every stage. Progressing systematically from log selection and rough blocking to delicate facial sculpting and weather sealing transforms standard timber into an impressive woodland sculpture. Always verify your protective equipment, check your bar oil delivery and chain tension before making the first cut, and let the natural grain of the wood guide your carving decisions.
About the author

Clint DeBoer is a longtime tool-industry editor and reviewer with decades of experience in technical media, product evaluation, and hands-on testing. His work has emphasized objective testing methods for power tools, accessories, outdoor equipment, and professional gear, with particular attention to performance, technology, usability, and practical value for professionals and serious DIY users.