
How to Cut Logs Into Lumber With Chainsaw: Practical Milling Guide for 2026
Master how to cut logs into lumber with chainsaw to mill usable dimensional boards from raw timber using proper cutting guides and log handling tools in October 2026.
 By Bradley Ford
Updated October 2, 2026
By Bradley Ford
Updated October 2, 2026

Transforming raw yard logs or fallen timber into usable structural boards requires substantial cutting power, steady guidance, and strict attention to bar alignment. Slicing through longitudinal grain puts immense continuous strain on a powerhead, generating fine dust rather than coarse crosscut chips. When learning how to cut logs into lumber with chainsaw, operators must understand how specialized chain profiles, rigid bar guide attachments, and solid log-holding tools turn an aggressive bucking saw into a functional portable sawmill. Discovering the right balance between engine displacement and cutting feed pressure prevents premature cylinder scoring while producing uniform planks.
Success in small-scale chainsaw milling depends heavily on stabilizing the trunk and establishing a flat reference plane before making repeated passes. Utilizing dedicated attachments allows woodworkers to mill square beams and dimensional lumber without investing thousands in a heavy commercial band sawmill. If you are comparing different cutting approaches, exploring dedicated tools for cutting wood planks offers valuable context on how specialized saws handle grain orientation. Equipping your powerhead with the proper ripping chain and guide accessories ensures clean results and preserves mechanical longevity across every cutting session.
| Award | Product | TGH Score About TGH ScoreThe TGH Score is our own rating from 0 to 10, based on performance, design and build, ease of use, and value. It reflects independent research and is never influenced by manufacturers, retailers, or affiliate commissions. Learn more › | |
|---|---|---|---|
| Best Overall |
Felled Cant Hook Logging Tool 60 Inch
|
9.1/10 | Buy |
| Best Value |
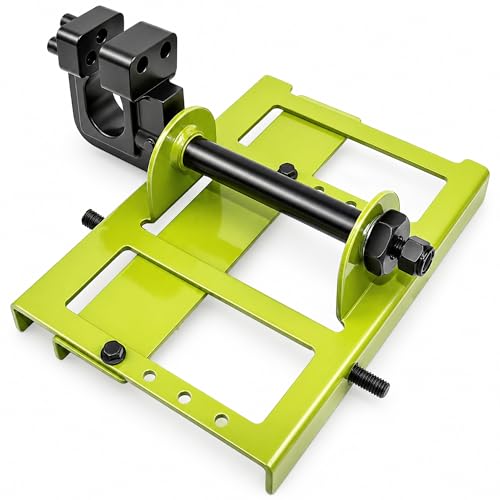 Timber Tuff Portable Steel Lumber Cutting Guide
|
8.8/10 | Buy |
Operational Principles for Milling Lumber with a Chainsaw
Milling dimensional boards from freshly felled timber demands a methodical operational approach that differs fundamentally from ordinary firewood bucking. Ripping along the length of wood fibers generates heavy thermal loads, produces dense flour-like dust, and tests the continuous torque of your powerhead. By pairing a capable saw with sturdy guidance hardware, operators can produce square timbers and uniform planks directly at the felling site. Mastering the setup, maintenance, and tool handling required for chainsaw milling ensures accurate cuts while extending the working life of your equipment.
Powerhead Displacement and Guide Bar Requirements for Ripping
Engine displacement serves as the primary limiting factor when converting raw logs into dimensional lumber. Crosscutting severs wood fibers across the grain with minimal sustained resistance, whereas ripping cuts parallel to the fiber structure and demands continuous wide-open throttle performance. Gasoline powerheads under fifty cubic centimeters generally struggle to maintain chain speed during full-depth rips, often leading to clutch slippage or cylinder overheating. Selecting a saw with fifty to seventy cubic centimeters of displacement provides the sustained torque necessary to pull through dense seasoned hardwoods without stalling.
Guide bar length must be sized according to log diameter while accounting for the space consumed by milling attachments. Clamping a guide attachment or mill bracket onto the guide bar typically reduces usable cutting length by two to four inches. Operating with a bar that is too long for the powerhead displacement bogs the engine down, whereas an undersized bar prevents single-pass slabbing. Matching the powerhead oil output to bar length is equally vital, as ripping generates elevated friction along the bar rails that quickly scorches dry components.
Crosscut Chains Versus Dedicated Ripping Chains
Standard chainsaw chains feature cutter teeth ground at thirty to thirty-five degree angles optimized for severing wood fibers perpendicular to the trunk. Using a standard crosscut chain for longitudinal ripping pulls long, stringy shavings that quickly pack the drive sprocket cover and choke the discharge chute. These long shavings force the operator to clear clogs repeatedly, disrupting cut momentum and causing uneven surfaces on the cut board. Standard chains also create excessive chatter when pulled along the grain, leaving deep gouges that require heavy planing to smooth out.
Dedicated ripping chains resolve these issues by using a modified top-plate filing angle ground to approximately ten degrees. This shallow angle acts like a micro-plane, scraping wood fibers cleanly and generating fine, powdery chips that exit the sprocket housing freely. Some ripping designs incorporate scoring cutters paired with clearing cutters to stabilize the kerf and produce remarkably smooth lumber faces. Maintaining proper depth gauge clearance at approximately twenty-five thousandths of an inch prevents the cutters from grabbing too aggressively, ensuring smooth forward progression.
Essential Log Handling and Positioning with a Cant Hook
Proper log positioning on the ground dictates both cutting accuracy and operator safety before any cuts begin. Raw timber lying flat on uneven terrain tends to roll unpredictably or trap dirt and stones directly inside the cutting path. Rolling the log onto sturdy wooden bunks keeps the bark elevated above abrasive ground grit that instantly dulls cutting teeth. Stabilizing the timber at an ergonomic working height also reduces operator back strain during extended milling sessions.
Leveraging a heavy-duty tool like the Felled Cant Hook Logging Tool 60 Inch gives operators the mechanical advantage needed to rotate large, dense trunks safely. Its powder-coated carbon steel handle and durable cant hook latch onto logs measuring up to fifteen and a half inches in diameter, allowing controlled rotation onto level skids. The rubber sleeve provides positive grip when applying downward leverage to roll stubborn timber into alignment. Once positioned, securing the log with wooden wedges prevents movement while the saw establishes the initial guide cut.
Setting Up a Vertical Guide Attachment on the Bar
Cutting consistent boards freehand with an unguided chainsaw is nearly impossible, as the bar naturally wanders along paths of least mechanical resistance. Utilizing a dedicated bar-mounted cutting attachment establishes a rigid, repeatable reference line along the entire log length. Compact vertical cutting attachments clamp directly over the chainsaw guide bar without requiring permanent drilling or saw modifications. These guides ride against a straight wooden guide board secured to the top of the log, translating a flat plane down into the timber.
The Timber Tuff Portable Steel Lumber Cutting Guide exemplifies this approach by providing an adjustable steel frame built to dimension boards up to two by six inches. Measuring eight by eight and a quarter inches, the compact steel assembly is simple to transport to remote felling sites and fast to set up on site. Its durable powder-coat finish withstands wet sawdust and harsh outdoor exposure while holding the guide bar perpendicular to the guide board. Tightening the clamping hardware evenly across the bar prevents deflection, ensuring that each pass produces uniform plank thickness from end to end.
Step-by-Step Milling Procedure from Round Log to Square Cant
The milling sequence begins by fastening a perfectly straight two-by-four or two-by-six dimensional board directly on top of the rounded log using sturdy wood screws. This guide board provides the flat reference surface for the cutting attachment, compensating for natural trunk tapers and bark irregularities. Operators adjust the guide depth on the attachment to determine the thickness of the first opening slab, commonly called the slab cut. Once the guide board is fastened securely, inspect the log for any surface nails, stones, or hidden wire that could damage the chain.
With the saw engine warm and running at wide-open throttle, introduce the nose of the bar into the end of the log with the guide bracket resting against the reference board. Maintain steady, moderate forward pressure without forcing the saw, allowing the ripping cutters to slice through the wood at their natural feed rate. After completing the first cut, remove the rounded bark slab to reveal a flat, clean wooden face. Similar to how woodworkers align structural posts with saws designed to cut fence posts, establishing this first flat reference plane is critical for all subsequent dimensional cuts.
Rotate the log ninety degrees using your cant hook so the newly milled flat face rests firmly against your wooden bunks or support skids. Reattach the reference guide board perpendicular to the first cut or use the flat face as a natural guide surface to mill the second edge. Repeating this process creates a squared timber, known in the sawmill trade as a four-sided cant. Once the log is transformed into a clean square cant, you can slice parallel dimensional boards rapidly by resetting the guide bracket width for each consecutive pass.
Managing Sawdust, Engine Heat, and Bar Lubrication
Chainsaw milling subjects two-stroke engines and cordless electric powerheads to thermal demands far beyond regular firewood processing. Standard bucking cuts last only a few seconds, allowing the powerhead to cool during idling intervals between cuts. In contrast, ripping a ten-foot trunk requires minutes of continuous wide-open throttle operation under full mechanical load. Operators must clean the cylinder cooling fins and air filter frequently to maintain adequate airflow and prevent high-temperature engine seizure.
Bar and chain lubrication requires vigilant management throughout every milling run. Ripping produces extremely dry friction that can exhaust a bar oil reservoir before the fuel tank runs dry. Setting adjustable oil pumps to their maximum delivery rate ensures an adequate oil film reaches the bar rails and sprocket nose bearings. Periodically inspecting the oil discharge port behind the guide bar prevents fine ripping dust from packing the channel and starving the cutting chain of lubricant.
Troubleshooting Curved Cuts, Kerf Binding, and Chain Dullness
Wandering cuts and bowed planks represent the most frequent frustration for beginner chainsaw millers. When a saw pulls consistently to the left or right inside the cut, uneven cutter teeth are almost always the underlying cause. If the teeth on one side of the chain are shorter or filed at a steeper angle than the other, the chain naturally drifts toward the sharper, longer side. Dressing the guide bar rails with a flat file to remove mushroomed burrs and verify rail squareness helps keep the cutters tracking true.
Kerf binding occurs when the weight of the parting board settles downward and pinches the guide bar mid-cut. Driving small plastic felling wedges into the kerf behind the guide bar every few feet keeps the cut open and relieves pressure on the saw. Dullness also accelerates kerf binding and engine strain, signaling its presence when powdery dust replaces crisp shavings. Pausing to touch up the cutters with a round file matched to your chain pitch restores cutting speed and prevents costly guide bar warping.
Stacking, Stickering, and Drying Freshly Cut Boards
Freshly milled green lumber contains substantial cellular moisture that must evaporate slowly to prevent cupping, checking, and twisting. Stacking green boards directly on top of each other traps moisture, fostering mold growth and uneven shrinkage across the wood grain. To dry lumber properly, construct a level foundation elevated at least six to twelve inches above the soil using concrete blocks and sturdy timbers. This ground clearance promotes uniform airflow beneath the stack while preventing ground moisture from entering the bottom planks.
Place dry wooden spacer strips, known as stickers, perpendicular to the boards every twelve to sixteen inches along the stack. Aligning stickers vertically in direct columns over the foundation supports transfers the weight downward without bending green lumber. Seal the end grain of each plank immediately after cutting using commercial end sealer or latex paint to slow rapid moisture loss through the ends. Finally, weight the top of the stack with heavy blocks or strapping and protect the pile from direct sunlight and rain with an overhanging roof cover.
Personal Protective Equipment and Safe Milling Mechanics
Operating a chainsaw in a milling configuration requires strict adherence to safety standards and personal protective gear. The reactive forces generated during continuous ripping can pull the operator toward the log or push the powerhead back aggressively if cutters jam. Operators must wear certified chainsaw safety chaps containing cut-retardant ballistic fibers compliant with OSHA standards. Eye protection, heavy-duty work gloves, steel-toe boots, and a forestry helmet with hearing protection and a mesh face shield remain mandatory gear during all cutting tasks.
Positioning your body relative to the cutting plane is essential for maintaining control and mitigating kickback hazards. Never stand directly in line behind the guide bar; instead, maintain a balanced, wide stance to the side of the powerhead. Keep both hands firmly wrapped around the handles with your left thumb encircling the front handlebar to resist sudden reactive movements. Routinely test the inertia chain brake before starting each cut to verify that safety interlocks engage instantly in the event of an emergency.
Milling custom lumber at home transforms raw timber into valuable construction material when executed with proper technique and reliable equipment. Selecting an adequate powerhead displacement, sharpening cutters to a ten-degree ripping angle, and utilizing sturdy guide attachments ensures clean, dimensionally accurate planks. Investing the effort to rotate logs safely with a cant hook, wedge kerfs to prevent bar binding, and sticker green lumber for steady drying yields professional-quality boards that remain flat and stable for years to come.
About the author

Bradley Ford is an experienced hands-on tool tester with a background in farm equipment, welding, mechanical repair, and classic automobiles. His practical experience includes repairing and servicing high-end vehicles as well as testing tools, generators, lawn equipment, and workshop gear. He approaches product evaluation from the perspective of someone who regularly builds, repairs, and maintains equipment.