
How to Measure a Chainsaw Size: Practical Guide for 2026
Master how to measure a chainsaw size in October 2026 with clear steps for guide bar length, chain pitch, drive link count, and firewood markers.
 By Thomas Gaige
Updated October 2, 2026
By Thomas Gaige
Updated October 2, 2026

Timber processing demands precise equipment matching, because running an improper bar and chain setup risks severe engine strain, dangerous kickback, and uneven kerf tracking. Understanding how to measure a chainsaw size correctly allows firewood cutters and property maintenance operators to replace worn cutting attachments without guessing. While smaller yard clearing jobs might only call for dedicated pruning saws for gardening tasks, operating a power chainsaw requires strict dimensional alignment between the powerhead, guide bar, and saw chain.
Sizing mistakes often lead to loose chain slack, premature sprocket wear, or guide bars that overheat due to pinched drive links in the bar rails. Operators frequently turn to manual hand saws for cutting tree branches when precision is tricky, but getting the right dimensions on your chainsaw restores rapid cutting capability safely. By learning to measure effective bar length, chain pitch, drive link gauge, and bucking length, you can keep your saw running smoothly and maintain clean cuts across all your timber projects.
| Award | Product | TGH Score About TGH ScoreThe TGH Score is our own rating from 0 to 10, based on performance, design and build, ease of use, and value. It reflects independent research and is never influenced by manufacturers, retailers, or affiliate commissions. Learn more › | |
|---|---|---|---|
| Best Overall |
Maitys 2 Pack Chainsaw Chain Chart Measuring Tool
|
8.9/10 | Buy |
| Best Budget |
 Oregon OEM 556418 Chainsaw Bar & Chain Measuring
|
8.8/10 | Buy |
 HGroCA Firewood Measuring Tool for Chainsaw
|
8.8/10 | Buy | |
 HGroCA Firewood Measuring Tool for Chainsaw
|
8.6/10 | Buy | |
| Best Value |
 ontinny Adjustable Durable Stainless Steel
|
8.6/10 | Buy |
| Best Premium |
 FUFADADE Magnetic Firewood Measuring Tool
|
8.4/10 | Buy |
 Magnetic Firewood Measuring Tool,Magnetic Log
|
8.1/10 | Buy |
Everything You Need to Know About Measuring Chainsaw Bars, Chains, and Timber Dimensions
Measuring a chainsaw properly involves far more than simply holding a tape measure against the powerhead. Operators must evaluate four distinct dimensional criteria to maintain safe and efficient woodcutting operations. These dimensions include the effective cutting length of the guide bar, the pitch of the drive links, the gauge thickness of the tangs, and the overall drive link count. Understanding how to quantify each component guarantees that replacement parts fit seamlessly without endangering the saw or the operator.
Measuring Usable Guide Bar Length Versus Total Bar Length
Chainsaw guide bars are universally identified by their called length rather than their total physical tip-to-tail measurement. The called length represents the effective cutting reach that extends outward from the front casing of the chainsaw powerhead to the curved tip of the guide bar nose. To measure this dimension accurately, you must seat the bar securely on the powerhead with the chain tensioned properly. Measuring only the exposed steel provides the exact working capacity that the saw can cut in a single pass.
Taking this measurement requires a standard flexible tape measure and basic safety precautions. Always ensure the saw engine is turned off, the chain brake is engaged, and the spark plug wire is disconnected or the battery pack is removed before touching the bar. Hook the end of the tape measure directly against the front edge of the crankcase where the bar emerges from the housing. Pull the tape straight along the center of the bar to the outermost point of the nose sprocket, rounding up to the nearest even number of inches.
The overall physical length of an unmounted guide bar is always several inches longer than its advertised working length. The rear section of the bar contains the slotted tail mount, oil inlet passages, and chain tensioning holes that remain hidden beneath the clutch cover. A guide bar marketed with an 18-inch called length typically measures between 20 and 22 inches in overall physical steel length. Confusing total bar length with called length is the primary reason timber cutters accidentally purchase incorrect replacement chains.
Determining Saw Chain Pitch with Precision
Saw chain pitch defines the size of the chain and dictates the spacing between individual drive links. Technically, pitch is calculated by measuring the distance between any three consecutive rivets on the chain loop and dividing that number by two. Common pitches in modern chainsaws include 1/4 inch, 3/8 inch Low Profile, .325 inch, standard 3/8 inch, and .404 inch. Each pitch corresponds to specific engine displacement classes, bar styles, and timber bucking demands.
Attempting to measure pitch across rivet centers using a standard ruler often leads to measurement errors because rivet wear and stretched links distort the reading. Dedicated pocket measuring templates like the Oregon OEM 556418 Chainsaw Bar & Chain Measuring tool provide a much more reliable method. This high-visibility red gauge allows woodcutters to slide chain rivets into pre-cut notches to determine the exact pitch instantly. Utilizing a specialized reference tool eliminates guesswork and prevents matching errors on the workbench.
Chain pitch must match both the guide bar nose sprocket and the drive sprocket located behind the clutch drum. If an operator mounts a .325-inch pitch chain onto a saw equipped with a 3/8-inch drive sprocket, the drive links will not seat properly in the sprocket pockets. This mechanical mismatch causes severe vibration, chips the drive tangs, and can snap the chain under throttle load. Ensuring pitch uniformity across all three components is essential for smooth power transfer and cutting longevity.
Identifying Drive Link Gauge and Bar Groove Width
Chain gauge refers to the precise thickness of the lower drive link tangs that travel inside the guide bar groove. The four standard gauge dimensions used across modern chainsaws are .043 inch, .050 inch, .058 inch, and .063 inch. Guide bars are milled with matching groove widths to provide lateral stability while allowing the chain to circulate freely. Matching the gauge ensures that the cutters track straight through wood without binding or tilting sideways.
Measuring drive link gauge requires cleaning all debris out of the guide bar rail before taking a reading. Fine wood flour and sticky bar oil frequently cake inside the groove, which can artificially widen the rail or distort caliper measurements. Woodcutters can clean the rail with a dedicated bar groove cleaner or the edge of a putty knife. Once cleared, slide the drive link tang into the calibrated gauge slots of the Oregon OEM 556418 Chainsaw Bar & Chain Measuring tool or measure the tang with a digital dial caliper.
Installing the wrong gauge causes immediate operational failure and rapid component degradation. Placing a thinner .043-inch gauge chain into a .050-inch or .058-inch bar groove allows the cutters to lean sideways under load, producing curved kerfs that pinch the bar. Conversely, forcing a thicker .058-inch chain into a .050-inch groove creates intense friction that stalls the motor and burns the bar rails. Both scenarios overheat the cutting assembly and destroy the guide bar prematurely.
Counting Drive Links for Exact Loop Length
Two chains can share the exact same pitch, gauge, and advertised bar length while possessing different overall loop circumferences. For this reason, counting the total number of drive links is the only definitive way to verify replacement chain compatibility. Drive links are the triangular metal tangs on the underside of the chain that seat into the guide bar groove and engage the drive sprocket. Standard loop counts vary widely depending on the powerhead brand and bar tail mount geometry.
To count drive links accurately by hand, remove the chain from the bar and place it on a clean, flat surface. Mark one drive link tang clearly with a grease pencil, chalk mark, or piece of tape to serve as your starting reference point. Follow the loop around in a single direction, tallying each drive link until you reach the marked link again. Double-checking your count ensures you do not end up with a loop that is one link too long or too short to tension properly.
Woodcutters who process high volumes of firewood or maintain multiple saws often use specialized templates to accelerate this task. A bench-mounted template like the Maitys 2 Pack Chainsaw Chain Chart Measuring Tool simplifies counting across electric saws, farm saws, and commercial logging chains. Made from high-strength tear-resistant PVC, this three-section chart unrolls up to approximately 71.8 inches and provides clear segment alignment lines. Laying the chain directly along the waterproof, oil-resistant scale eliminates manual counting mistakes and speeds up workbench organization.
Reading Stamped Guide Bar Specifications
Most reputable guide bar manufacturers stamp critical dimensional data directly into the steel near the motor mount tail. This stamped code typically includes the bar length, chain pitch, gauge thickness, and required drive link count in a single alphanumeric sequence. For example, a stamp might read 18-inch, 3/8 LP, .050, 62DL, instantly answering every replacement specification. Checking this stamping before unmounting the bar saves considerable diagnostic time in the field.
Intense rail friction, sap buildup, and aggressive sawdust abrasion can wear away stamped markings over years of timber bucking. When these markings become unreadable, operators must fall back on manual caliper measurements or pitch gauges to reconstruct the specifications. Inspecting the bar tail can also reveal the mount pattern code, which dictates the slot width and oil passage alignment. Keeping a written log of your saw model and bar part numbers in your workshop prevents confusion when the original stamps fade.
The motor mount pattern is just as critical as the working length of the bar. Saws manufactured by different brands feature distinct stud diameters, bar adjuster pin locations, and oiler discharge holes. Mounting a bar with an improper tail slot prevents the powerhead oil pump from delivering lubricant to the bar groove. A dry bar rail overheats within seconds, discoloring the steel and melting the drive links under heavy throttle.
Matching Guide Bar Sizing to Powerhead Engine Displacement and Battery Voltage
Equipping a chainsaw with an appropriately sized guide bar depends entirely on the powerhead displacement or battery voltage. Compact gas engines between 30cc and 40cc, as well as 18-volt battery platforms, operate most efficiently with 10-inch to 14-inch bars. Mid-range saws between 45cc and 60cc or 40-volt to 60-volt brushless platforms comfortably pull 16-inch to 20-inch bars through dense hardwood rounds. Understanding these output thresholds is just as critical as selecting electric saw setups for post cutting when squaring timber outdoors.
Installing an excessively long bar on an underpowered saw creates severe mechanical problems under cutting load. When the chain engages dense timber, the long cutting surface creates massive parasitic drag that bogs down the motor and slips the centrifugal clutch. Cordless battery saws subjected to this excessive load experience rapid voltage drop and trigger thermal protection shutdowns to save the cells. Matching bar length strictly to the powerhead capacity ensures that the chain maintains high surface speed for clean, efficient chip removal.
Cutter tooth geometry also plays a vital role in determining how much cutting resistance the engine encounters. Full-chisel cutters feature razor-sharp square corners that sever hardwood fibers rapidly, but they demand higher engine torque and dull quickly in dirty bark. Semi-chisel cutters utilize rounded working corners that hold an edge longer in dusty conditions while placing less continuous drag on the powerhead. Opting for narrow-kerf cutting systems further reduces chip volume, allowing smaller saws to pull longer bars with less effort.
Measuring Firewood Log Lengths with Bar-Mounted Magnetic Tools
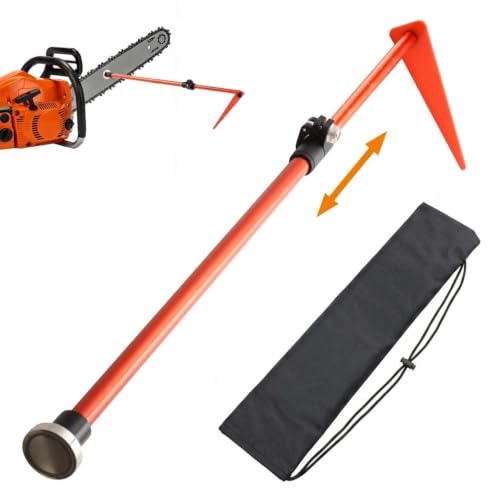
In firewood production, measuring chainsaw size also encompasses the physical cutting length marked on each log round. Producing uniform firewood blocks is essential for neat woodpile stacking, predictable airflow during seasoning, and a reliable fit inside residential wood stoves. Traditional methods like marking logs with chalk or pulling a manual tape measure between cuts slow down timber processing significantly. Bar-mounted magnetic firewood measuring tools solve this problem by providing an integrated visual cutting guide on every pass.
Woodcutters commonly rely on adjustable magnetic markers like the HGroCA Firewood Measuring Tool for Chainsaw to size firewood between 16 and 29 inches. This tool features a heavy steel pot magnet shielding an N52 magnetic core that clamps firmly onto steel guide bars of 10 inches and larger. Constructed from lightweight 6061-T6 aircraft aluminum, it features a triangular sighting pointer that glides over rough bark without snagging. For compact electric saws and smaller bars, the HGroCA Firewood Measuring Tool for Chainsaw offers a 14-inch to 24-inch range with a slim base designed to avoid chain contact.
Other durable options include the ontinny Adjustable Durable Stainless Steel stick, which telescopes from 12 to 20 inches with a one-button locking buckle. Rustproof stainless steel construction prevents bending, while a wide 2.2-inch magnet delivers stable attachment through intense cutting vibrations. Similarly, the FUFADADE Magnetic Firewood Measuring Tool and the Magnetic Firewood Measuring Tool,Magnetic Log provide high-visibility orange aluminum rods extending from 16 to 29 inches. Positioning these magnetic guides near the bar tip allows operators to mark ground logs without bending over, saving substantial physical strain during cord processing.
Checking File Sizing and Depth Gauge Clearances
Measuring chain dimensions directly dictates the sharpening file diameter required to maintain cutter teeth. Using an incorrect round file diameter alters the cutting hook angle and degrades cutting efficiency. Low-profile 3/8-inch chains require a 5/32-inch round file, .325-inch pitch chains typically require a 3/16-inch file, and standard 3/8-inch chains utilize a 7/32-inch file. Verifying file diameters with the Oregon OEM 556418 Chainsaw Bar & Chain Measuring tool ensures you maintain proper cutter geometry every time you sharpen.
Depth gauges, commonly called rakers, control how deeply each cutter tooth bites into the timber grain. If depth gauges remain too high, the cutters simply scrape across the wood surface, producing fine powder instead of thick chips. If depth gauges are filed too low, the chain bites aggressively, causing harsh chattering and violent rotational kickback risks under ANSI B175.1 standards. Operators should use a progressive depth gauge tool to check that raker clearance remains within 0.025 to 0.030 inches below the cutting tooth.
Wood hardness and seasonal temperatures also influence optimal depth gauge dimensions. Cutting dry, seasoned hardwoods like hickory or oak requires slightly higher depth gauges to prevent engine stall and reduce strain on the powerhead. Conversely, cutting green softwoods permits slightly deeper cuts because the wood fibers yield more easily to the passing tooth. Verifying depth gauge clearances after every third or fourth sharpening session maintains consistent cutting speed across varying timber species.
Inspecting Wear on Drive Sprockets and Guide Bar Rails
Accurate dimensional measurements must also account for physical wear across the guide bar rails and drive sprockets. Over extended bucking sessions, the continuous movement of the chain wears down the flat surface of the bar rails, forming sharp lateral burrs. Just as timber preparers rely on specialized tools for cutting clean timber planks, chainsaw operators must periodically dress their guide bars with a flat file. Removing these metal burrs and squaring the rail tops keeps the chain tracking vertically without binding in deep kerfs.
The drive sprocket that powers the chain loop also suffers from abrasive wear over time. Operators should measure the depth of the grooves worn into the sprocket teeth or rim floating pockets. If wear grooves exceed 0.020 inches in depth, the sprocket must be replaced immediately. Running a fresh chain on a severely grooved sprocket alters the effective pitch spacing, rapidly destroying the new chain drive links and causing chain derailment.
Proper chain tensioning provides the final physical check before taking the saw into the timber stand. When cold, a correctly tensioned chain touches the underside of the guide bar rail without sagging, yet pulls freely around the bar by gloved hand. Performing a quick snap test by pulling the chain downward from the bottom rail confirms that the drive links snap cleanly back into the groove. Verifying tension, sprocket condition, and all component dimensions ensures safe operation, maximum cutting efficiency, and dependable saw performance throughout the cutting season.
About the author

Thomas Gaige combines mechanical engineering knowledge with extensive hands-on construction experience. His background includes engineering, AutoCAD design, general contracting, residential and light-commercial construction, automotive restoration, cabinetry, fabrication, and workshop projects. This combination gives him a practical framework for evaluating tools based on engineering, performance, usability, and jobsite demands.