
How to Tighten Chainsaw Chain: A Practical Guide for 2026
Master how to tighten chainsaw chain techniques in October 2026 to eliminate bar sag, prevent derailment, and keep your cutting equipment running safely.
 By Edward Ting
Updated October 2, 2026
By Edward Ting
Updated October 2, 2026

Bucking through seasoned hardwood or trimming storm debris quickly exposes the mechanical limits of a poorly maintained cutting setup. When drive links begin drooping beneath the guide bar belly, cutting efficiency drops drastically, rail heat builds up, and the risk of throwing a chain escalates. Mastering how to tighten chainsaw chain assemblies ensures smooth chip clearing, prevents premature wear on your drive sprocket, and maintains critical cutting accuracy across every pass. While manual cutting tasks often rely on simple tools like pruning saw options for smaller branches, powered timber equipment demands strict adherence to tension tolerances to protect both the machine and the operator.
Thermal expansion during heavy bucking causes saw chains to stretch slightly, requiring regular adjustments before, during, and after operation. A chain that hangs too loose can easily derail from the guide bar groove, while an over-tightened loop places destructive friction on the bar rails and strains the clutch assembly. Maintaining proper tension involves understanding the interaction between the guide bar mount studs, the adjuster pin mechanism, and the bar nose lift technique. Equipping yourself with dependable combination screnches and replacement adjuster screws makes tension adjustments straightforward, keeping your cutting system balanced and field-ready for demanding outdoor work.
| Award | Product | TGH Score About TGH ScoreThe TGH Score is our own rating from 0 to 10, based on performance, design and build, ease of use, and value. It reflects independent research and is never influenced by manufacturers, retailers, or affiliate commissions. Learn more › | |
|---|---|---|---|
| Best Overall |
Universal Chainsaw Chain Repair Kit
|
9.1/10 | Buy |
| Best Value |
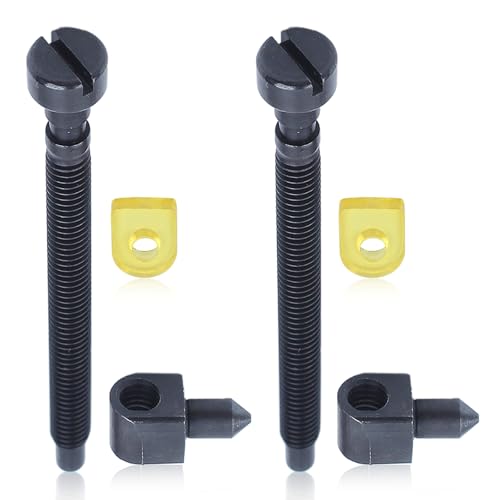 HAISHINE Pack of 2 Chain Adjuster Tensioner Screw
|
8.9/10 | Buy |
| Best Budget |
 Oregon OEM 556418 Chainsaw Bar & Chain Measuring
|
8.8/10 | Buy |
 MetVot 3 Pack Chainsaw Wrench 13 by 19 mm 1/2x3/4
|
8.3/10 | Buy | |
| Best Premium |
 safycaby 2 Set Chain Adjuster Screw Tensioner
|
8.0/10 | Buy |
Comprehensive Guide to Chainsaw Chain Tensioning and Maintenance
Achieving the correct chain tension is vital for safe timber cutting, efficient engine power transfer, and preventing sudden derailment during operation. A properly tensioned chain fits snugly against the lower guide bar rail without sagging, yet pulls freely around the bar by gloved hand when the chain brake is disengaged. When pulled firmly away from the top rail, the drive link tangs should remain partially engaged within the bar groove rather than clearing the rail edges entirely. Understanding the mechanical interaction between your guide bar, tensioning pin, and clamping nuts ensures that your saw maintains optimal cutting geometry without placing destructive friction on the powerhead components.
Determining Proper Chain Tension: The Snap Test and Visual Indicators
Visual inspection provides the first clue regarding cutting assembly readiness before starting any timber processing work. Look along the underside of the guide bar to see whether the chain links hang down with daylight showing between the tie straps and the rail surface. Any visible drooping beneath the guide bar belly indicates that the chain has loosened beyond safe operational limits. Conversely, if the chain appears pulled so taut that it compresses rigidly against the rail with no vertical play, the assembly is over-tightened and will cause rapid friction damage.
The snap test serves as the primary manual check for verifying correct tension across both gas and battery-powered chainsaws. To execute this test safely, ensure the powerhead is completely shut off and wear a pair of heavy leather or cut-resistant work gloves. Grasp a cutter along the top middle section of the guide bar and pull upward with moderate hand force. A properly adjusted chain should lift just enough to expose approximately half of the drive link tangs while remaining seated in the groove, snapping crisply back against the rail when released.
Required Tools and Workspace Preparation
Safe tension adjustments require a stable work environment and the appropriate service tools before touching the cutting assembly. Place the chainsaw on a clean, flat surface such as a sturdy workbench or a level tailgate to prevent debris from entering the clutch cover. Always turn off the ignition switch, disconnect the spark plug wire on gas engines, or remove the lithium-ion battery pack on cordless models. Disengaging the chain brake is necessary to allow free movement during tension testing, which makes power isolation an indispensable safety precaution.
The fundamental tool for adjusting almost any standard chainsaw cutting setup is a dual-ended combination wrench known as a scrench. High-strength tools like the MetVot 3 Pack Chainsaw Wrench provide standard 13 mm and 19 mm hex sockets paired with a wide flat-blade screwdriver tip. The socket ends fit the captive or removable bar nuts holding the clutch cover in place, while the screwdriver end engages the chain adjuster screw. Keeping dedicated combination wrenches in your field kit ensures that you have the mechanical leverage required to loosen hardware without rounding off the fastener edges.
Step-by-Step Chain Tensioning Procedure for Dual-Nut Guide Bars
The tensioning sequence begins by slightly loosening the bar nuts that secure the clutch cover against the powerhead. Fit your scrench over each nut and turn them counterclockwise just enough to relieve clamping friction, usually about one-half to one full turn. Do not remove the nuts completely or loosen them so much that the guide bar wobbles loosely on the mounting studs. The guide bar must retain enough frictional stability against the crankcase to slide smoothly without tilting excessively during adjustment.
Lift the nose of the guide bar upward with one gloved hand and hold it firmly in that elevated position throughout the entire tensioning process. Chainsaws naturally experience upward cutting forces at the bar nose during operation, which creates mechanical play between the bar slot and mounting studs. If you tighten the chain while the bar nose points downward, the first cut you make will force the nose upward, immediately slackening the chain. Maintaining upward pressure on the bar nose ensures that the guide bar settles into its true working orientation before you tighten the hardware.
While supporting the bar nose, insert the flat-blade end of your scrench into the chain tensioner screw and rotate it clockwise to advance the tensioner pin forward. Turn the adjustment screw gradually in small increments, checking the bottom rail until the sagging drive links pull flush into the bar groove. Tighten the rear bar nut first followed by the front bar nut using your scrench while continuing to hold the bar nose upward. Finally, pull the chain along the top rail by gloved hand to verify that it rotates smoothly without stiff spots or mechanical resistance.
Diagnosing and Replacing Damaged Chain Adjuster Screws and Pins
A chainsaw adjuster mechanism takes substantial mechanical load, and repeated field adjustments can eventually strip the threads or shear the adjustment pin. When turning the tension screw fails to move the guide bar forward or backward, the internal tensioner pin is often stripped, sheared, or jammed with packed wood chips. Operating a saw with a damaged adjuster makes maintaining proper chain tension impossible and risks throwing the chain under load. Inspecting the adjuster pin whenever the clutch cover is removed helps catch thread stripping or physical bending before total mechanical failure occurs.
Aftermarket replacement parts such as the HAISHINE Pack of 2 Chain Adjuster Tensioner Screw provide direct replacements for worn components across compatible Husqvarna and Jonsered models. Similarly, universal hardware like the safycaby 2 Set Chain Adjuster Screw Tensioner offers durable metal replacement screws designed to withstand regular tensioning pressure. When reinstalling the clutch cover and guide bar, always verify that the tensioner pin properly enters the small adjustment hole stamped into the bar body. Forcing the clutch cover down when the pin is misaligned will bend the pin, crush the guide bar, or crack the crankcase casting.
Matching Chain Pitch, Gauge, and Drive Links to Guide Bar Grooves
Proper chain tensioning depends heavily on ensuring that the cutting chain perfectly matches the dimensional specifications of your guide bar and drive sprocket. Chainsaw chains are defined by three critical numbers: pitch, gauge, and drive link count. Pitch represents the distance between any three consecutive rivets divided by two, while gauge designates the thickness of the drive link tang that rides inside the bar rail groove. Installing a chain with mismatched specifications will cause severe binding, erratic tensioning, rail gouging, or complete drive sprocket failure.
Identifying unknown chain and bar dimensions in the field is made straightforward using dedicated layout gauges such as the Oregon OEM 556418 Chainsaw Bar & Chain Measuring Tool. This compact tool measures chain pitch, bar groove width, chain gauge, and round file diameter through precision cutouts. When chains suffer damage or require custom link adjustments for specialized bar lengths, repair tools allow operators to perform targeted maintenance without discarding the entire loop. A dedicated set like the Universal Chainsaw Chain Repair Kit provides a compact chain breaker, rivet spinner, and joiner link sets compatible with various pitches including .325-inch and 3/8-inch low profile.
Operational Hazards: Chain Derailment, Over-Tensioning, and Thermal Expansion
Allowing a chainsaw chain to run loose creates an immediate and severe hazard known as chain derailment. When a slack chain rotates at full throttle, centrifugal force throws the chain outward at the bar nose, allowing the drive links to jump out of the bar groove. A derailed chain can whip violently back toward the operator, damaging the aluminum crankcase and gouging the drive links against the metal chain catcher peg. Regular tension checks during heavy firewood bucking eliminate the slack that leads to dangerous chain throws.
Conversely, over-tightening a chain creates massive frictional drag between the tie straps and the hardened guide bar rails, leading to rapid rail scorching and burned oil. This extra resistance places extreme thermal load on the centrifugal clutch and causes the drive sprocket teeth to wear prematurely into hooked profiles. Friction generated during cutting also causes chain links to expand thermally, producing temporary mid-cut slack. Operators must remember to loosen any chain adjusted while hot before storing the saw, because cooling metal contracts forcefully and can bend crankshafts or warp guide bars.
Guide Bar Rail Dressing and Wear Patterns Affecting Tension Stability
A chain cannot maintain consistent tension if the guide bar rails underneath it have developed physical defects or uneven wear patterns. Over time, the sliding friction of the chain creates mushroomed metal burrs along the outer edges of the guide bar rails and splays the internal groove. When the groove widens, the chain tilts side to side instead of standing vertical, producing curved cuts and erratic tension swings. Inspecting the bar rails with a straightedge helps identify whether the rails have worn down unevenly or lost their true perpendicular square.
Routine guide bar maintenance involves dressing the rails with a flat file to remove raised wire burrs and level the running surface. Operators should also run a groove cleaner along the entire bar slot to scrape out compacted sawdust and clear the small oil inlet holes. For users who also maintain manual cutting equipment, utilizing well-maintained hand saws for cutting tree branches provides an easy way to handle light perimeter pruning without firing up a powered chainsaw. Flipping the guide bar upside down each time you service the chain distributes rail friction evenly, prolonging bar life and stabilizing chain tension.
Essential Safety Protocols, PPE, and Reactive Force Management
Working with powered cutting machinery requires continuous respect for ANSI safety standards and proper personal protective equipment to prevent catastrophic injuries. Operators should always wear cut-retardant chainsaw chaps meeting ASTM standards, heavy-duty safety boots, cut-resistant gloves, eye protection, and a forestry helmet with a wire-mesh face shield. While smaller alternative cutting equipment like electric timber cutting tools offers distinct handling characteristics for fixed construction tasks, chainsaws produce dynamic reactive forces that demand unwavering body positioning and full safety gear.
Maintaining proper chain tension directly contributes to kickback mitigation and overall reactive force control during timber cutting. The most dangerous reactive force is rotational kickback, which occurs when the moving cutters in the upper quadrant of the guide bar nose strike solid wood or an unseen branch. A loose chain exacerbates kickback risk by increasing the likelihood of cutter grabbing and violent chain whipping along the upper rail. Testing both the manual and inertia-activated functions of your chain brake should be an automatic habit before starting the engine or making your first cut.
Practical Operational Takeaways for Reliable Field Cutting
Establishing a disciplined pre-flight inspection routine ensures that your chainsaw remains efficient, dependable, and safe throughout every woodcutting project. Before pulling the starter cord, check that your bar nuts are torqued, the chain passes the snap test, the oil reservoir is filled with clean bar lubricant, and the chain brake engages crisply. After making your initial cuts in clean timber, shut the powerhead down and re-check the chain tension once the metal has reached operating temperature. Making tension inspection a second-nature habit preserves your guide bar, saves wear on your powerhead, and keeps your timber work moving smoothly.
About the author
Edward Ting is an experienced amateur astronomer, telescope reviewer, and astronomy educator known for his detailed equipment evaluations. With an engineering background and extensive experience reviewing telescopes and astronomical accessories, he helps astronomy enthusiasts understand optical performance, equipment design, and practical considerations when selecting observing equipment.