
How to Remove Sod and Grass With a Shovel: A Practical Guide for 2026
Learn how to remove sod and grass with a shovel efficiently in October 2026 using proper blade angles, root-slicing techniques, and back-saving posture.
 By John Snow
Updated October 2, 2026
By John Snow
Updated October 2, 2026
Carving through established turf requires slicing dense root mats and compacted topsoil without exhausting your back or mangling garden borders. Homeowners and landscapers often face hardpack earth, hidden stones, and stubborn root systems when converting lawn into planting beds or patio spaces. Understanding how to remove sod and grass with a shovel comes down to selecting the proper blade geometry, maintaining clean cutting edges, and executing efficient horizontal leverage. With the right technique, you can lift uniform turf strips quickly while preserving nutrient-rich topsoil underneath.
Standard curved digging shovels often struggle with flat peeling cuts because their dished bowls force dirt downward rather than skimming under the root layer. When dealing with difficult soil conditions, such as digging in heavy clay soil, using a dedicated flat-edged sod lifter or sharpened square spade makes an immense difference in physical effort. Pairing sharp cutting edges with proper foot placement ensures consistent penetration through tangled root zones. Adopting biomechanically sound lifting mechanics protects your lumbar spine during repetitive yard work, turning an intimidating excavation task into a manageable weekend project.
| Award | Product | TGH Score About TGH ScoreThe TGH Score is our own rating from 0 to 10, based on performance, design and build, ease of use, and value. It reflects independent research and is never influenced by manufacturers, retailers, or affiliate commissions. Learn more › | |
|---|---|---|---|
| Best Overall |
Bully Tools Heavy Duty Sod Lifter
|
8.6/10 | Buy |
Mechanics, Tools, and Step-by-Step Execution for Manual Sod Removal
Manual sod removal demands a systematic approach that balances physical leverage, blade sharpness, and soil moisture conditions. Stripping a lawn by hand is labor-intensive work, but using the correct earthmoving equipment transforms an unwieldy chore into an orderly process. Before driving a blade into the turf, learning how grass roots anchor into topsoil allows you to extract sod at an optimal thickness without removing unnecessary dirt. Slicing clean horizontal ribbons preserves structural soil integrity for future plantings while keeping sod slabs light enough to transport safely.
The Mechanics of Severing Turfgrass Root Networks
Lawn grasses establish dense, intertwining fibrous networks that anchor firmly into the top few inches of topsoil. Species such as Kentucky bluegrass, Bermuda grass, and tall fescue spread via subterranean rhizomes or surface stolons that create a continuous, elastic vegetative carpet. Slicing through this dense crown requires a blade that shears horizontally beneath the active crown without diving deep into the subsoil. If you dig too deep, you waste valuable energy lifting dead subsoil weight and create deep hollows that require expensive fill dirt later.
Aiming for an extraction thickness of one to one and a half inches removes the root crown and vegetative buds needed to prevent grass regrowth. Striking this target depth ensures that the cut sod retains just enough soil to keep roots intact if you plan to transplant the turf elsewhere. Thinner cuts may cause the sod strips to tear or fall apart during transport, leaving viable root fragments in the ground that will sprout into weeds. Maintaining consistent horizontal blade depth keeps the base of your excavation level and ready for grading or amendments.
Choosing Between Sod Lifters, Flat Spades, and Digging Shovels
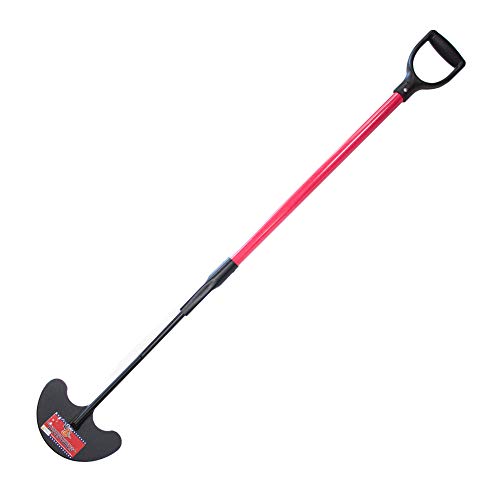
A dedicated sod lifter, such as the Bully Tools Heavy Duty Sod Lifter, incorporates a distinct blade geometry engineered specifically for skimming beneath turf. Unlike standard digging tools, a sod lifter features a wide, flat head angled offset from the handle socket to glide parallel to the ground surface. This flattened orientation lets the user push the steel edge forward horizontally while standing relatively upright, minimizing the need to stoop. The beveled front edge acts like an unpowered turf cutter, shearing root tendrils evenly across its full width.
Garden spades and square transfer shovels offer alternative options for lawn removal, though each brings distinct mechanical trade-offs. A flat garden spade excels at slicing vertical border edges because its straight cutting lip creates crisp, vertical trench walls. Round-point digging shovels, on the other hand, feature dished bowls and steep forward lift angles that inherently resist horizontal skimming. When forced under turf, a round-point shovel naturally burrows deeper into subsoil or rocks backwards, tearing the grass rather than peeling it smoothly.
Assessing Blade Metallurgy, Gauge, and Handle Construction
Blade thickness and steel quality determine whether a sod-cutting tool survives prolonged contact with hardpan, hidden rocks, and aggressive tree roots. Thin stamped sheet metal blades under 14-gauge often flex or curl at the corners when driven into heavy ground by boot pressure. Heavy-duty tools constructed with a 12-gauge steel head provide structural rigidity that resists bending under lateral foot pressure and forward thrust. Solid welded necks and reinforced blade sockets transfer the user pushing power directly to the cutting edge without flexing or loosening over time.
Handle materials and grip geometry significantly affect user control during horizontal turf slicing operations. A short D-grip handle provides superior wrist alignment and rotational stability compared to a long straight shaft when you need to push and pry low to the ground. Handles constructed from reinforced fiberglass offer exceptional resistance to weather exposure, moisture rot, and seasonal warping in wet outdoor conditions. Ash hardwood shafts provide natural shock damping that softens the impact of striking buried rocks, though they require routine oiling to prevent splintering.
Pre-Excavation Preparation and Soil Moisture Management
Soil moisture plays a pivotal role in determining the physical difficulty of manual sod extraction. Parched, bone-dry turf binds like concrete, turning root-slicing into a punishing task that rapidly dulls cutting edges and deflects blades. Conversely, saturated, waterlogged soil produces heavy, muddy sod slabs that stick tenaciously to steel blades and tear into sloppy clumps. The ideal working condition occurs roughly twenty-four to forty-eight hours after a deep soaking rain or controlled irrigation cycle.
Before beginning any excavation work, inspect your lawn carefully and take steps to protect hidden underground infrastructure. Mowing the target grass area to the lowest setting on your mower reduces surface friction and makes cutting lines much easier to see. Always contact local utility location services by calling 811 before excavating to ensure you do not strike buried electrical cables, gas conduits, or irrigation pipes. Once the site is verified and prepped, clear away surface stones, decorative mulch, and fallen branches that might impede tool travel.
Marking, Edging, and Grid-Cutting the Work Area
Establishing clean boundary cuts prior to horizontal lifting prevents ragged turf tears and keeps your new garden edges neat. Lay down a straight garden hose or stake out string lines to define the exact perimeter of the lawn area you intend to remove. Take a sharp garden spade or flat sod lifter and drive it vertically along the perimeter guidelines using direct downward foot pressure. Severing the perimeter roots entirely isolates the work area from the surrounding lawn and prevents live grass from pulling away from neighboring turf.
Dividing the interior turf into a checkerboard grid pattern makes the lifting and disposal phases significantly more manageable. Score parallel vertical lines spaced twelve to eighteen inches apart across the entire lawn patch, cutting completely through the root layer. Then, cut perpendicular lines across the first set to create uniform squares or rectangles of sod. Slicing turf into manageable sections prevents the sod from becoming too heavy to lift once peeled from the underlying soil.
Step-by-Step Horizontal Slicing and Lifting Technique
Begin at one edge of your cut grid, positioning the beveled edge of your sod lifter at the seam of the first square. Set your leading foot onto the forward-turned step of the blade to drive the steel lip beneath the turf at a shallow angle. Keep the blade angle between fifteen and twenty-five degrees relative to the ground surface so it skims directly under the root zone. Once the blade bites beneath the crown, push down slightly on the handle to flatten the tool against the earth.
Drive the tool forward with smooth, rhythmic leg thrusts rather than relying solely on upper-body arm force. The flat 9-inch steel head acts as a wedge, severing fibrous root attachments as it advances across the underside of the sod square. If the blade stalls against dense root mats, a slight rocking motion from side to side helps the beveled edges slice through stubborn growth. Continue pushing forward until the blade passes completely through the opposite score line of the grid square.
Once severed from the earth beneath, gently lever the handle backward to pop the sod slab free from its bed. Grasp the edge of the loosened sod square with gloved hands and roll it up like a small carpet or lift it directly into a wheelbarrow. Inspect the exposed ground immediately to verify that the cut depth remains uniform and that no active root nodes remain behind. If you uncover an uneven hump of subsoil, skim it flat with the blade before moving on to adjacent grid sections.
Navigating Buried Obstacles, Tough Roots, and Rocky Ground
Striking buried fieldstones, construction gravel, or thick tree roots can instantly halt forward blade momentum and damage tool edges. When your blade encounters hard resistance, stop pushing immediately to avoid bending the blade corners or snapping the handle socket. Clear away loose turf around the obstruction with your hands to assess whether you are dealing with an isolated rock or dense root network. For severe subsurface stone layers, switching to specialized shovels designed for rocky ground prevents tool deformation while prying stubborn obstacles loose.
Never use a sod lifter as a high-leverage crowbar to lever out large boulders or heavy mature tree roots. Manual sod tools are designed for horizontal shearing forces, and excessive lateral prying can buckle socket welds or tear handle rivets. For surface tree roots thicker than your thumb, use a bypass lopper or root-cutting saw to cut clean breaks before continuing with the shovel. Maintaining a sharp cutting bevel on your sod lifter with regular hand filing helps it slice smaller root hairs cleanly without snagging.
Ergonomics and Biomechanics for High-Volume Lawn Clearing
Stripping an entire lawn places substantial biomechanical stress on the lumbar spine, shoulders, and wrist joints if done improperly. Bending at the waist while pushing a shovel creates high rotational torque that can lead to acute muscle fatigue or lower back strain. Maintain a neutral spine by bending at your knees and hips, allowing your large quadricep and gluteal muscle groups to generate forward driving power. Keeping the handle close to your pelvic center of gravity maximizes leverage while reducing the strain on your arms.
Take advantage of D-grip handles to maintain a balanced, two-handed grip that resists twisting forces during heavy turf peeling. Alternate your forward lead foot and switch hand positions periodically to distribute muscle exertion evenly across both sides of your body. Take short, scheduled breaks every twenty to thirty minutes to hydrate and stretch your lower back, hamstrings, and calves. If you notice signs of blister formation or wrist fatigue, wear vibration-damping work gloves with textured palms to improve your grip security.
Repurposing, Composting, or Disposing of Extracted Turf
Removed sod represents a valuable organic resource that can often be recycled back into your residential landscape rather than hauled away. Healthy turf squares can be used immediately to repair bare patches, erosion channels, or dog wear areas across other parts of your lawn. To transplant sod successfully, prepare the target bare soil by loosening the top two inches with a garden rake and watering lightly. Lay the salvaged sod squares tightly together, tamp them down firmly to eliminate air pockets, and keep them moist for two weeks.
If the extracted grass is overgrown with aggressive weed varieties, composting it upside down prevents unwanted weed seed germination while building rich soil. Stack the sod squares in a designated corner or inside a raised bed frame with the green grass facing downward and soil facing upward. Over several months, the lack of light kills the grass and root crowns, decomposing the sod into nutrient-dense, crumbly topsoil. You can also lightly shake each loosened sod piece over your new planting bed to reclaim loose soil before discarding the root thatch.
Tool Maintenance, Sharpening, and Seasonal Care
A sharp, well-maintained sod lifter requires significantly less physical thrust to slice through dense turf mats. Inspect the cutting edge periodically for nicks, rolled lips, or burrs caused by hidden gravel or sidewalk edges. Use a standard bastard mill file held at a thirty to forty-five degree angle along the upper beveled edge of the blade. Always push the file in one continuous stroke forward across the metal, avoiding back-and-forth sawing motions that ruin the cutting profile.
After completing your lawn project, wash all caked dirt and mud from the steel blade and handle using a stiff brush and water. Allowing damp clay to remain on the steel overnight promotes corrosion and pits the cutting surface, increasing friction during future digging tasks. Once the tool is completely dry, wipe the metal surfaces with a light coating of machine oil or paste wax to seal against atmospheric moisture. Store your sod tools hung vertically on a garage wall rack to protect the sharpened blade edge and prevent handle warping.
Mastering manual turf removal provides complete control over your landscaping beds while avoiding the soil compaction caused by heavy power equipment. By combining proper ground moisture, sharp tool edges, and steady horizontal leverage, you can strip sod efficiently and leave behind clean, workable soil. Inspect your newly cleared area for stray root fragments, level the subsoil with a transfer rake, and verify that borders meet your planting layout. With your lawn cleared and topsoil preserved, your ground is perfectly primed for planting flowers, shrubs, or laying hardscape pavers.
About the author
John Snow is an established outdoor journalist and equipment editor with decades of experience covering technical innovations, product evaluations, and outdoor equipment. His background in investigative reporting and technical journalism provides a strong foundation for explaining complex product specifications and helping consumers understand equipment performance.